Showing posts with label sewing. Show all posts

Sunday, August 4, 2013

DIY Napkins Tutorial

This is totally non-school related, but good to blog about none-the-less :)
Is there anyone else out there who uses cloth napkins? For whatever reason it seems that they just aren't used anymore. Growing up we always used cloth napkins. I think I can remember about three times {if that!} when we used paper napkins. To me, cloth napkins were "normal." I thought everyone used them. But when my friends ate supper at our house they all seemed confused and a bit skeptical of using pretty-printed fabric to wipe their mouths. 

There are many good reasons to use cloth napkins and I applaud anyone who uses them. 
1. Economical: For my husband & I, paper napkins would cost about $40/year. That's assuming we would use 1 napkin each for breakfast, lunch, & dinner. Obviously if you have children the number is going to increase. Saving $40 might not be a big deal to some people, but for my family a penny saved is a penny earned! 
2. Environmentally Friendly: Cloth napkins are reusable. Simply wash, dry, fold, and use. 
3. Easy on the Eyes: Adding napkins can add a lot to your table-scape! {uh oh, there's the Sandra Lee jargon comin' out} Seriously though, how adorable are these?? 
I promise I'm not one of those soap-box people who is trying to convince you to use cloth napkins. In fact, I'm just the opposite. Usually I'm the one who smiles & nods in order to prevent an argument, haha! I really do understand why people don't use them. The purpose of this tutorial is to show you how easy, affordable, & fun it is to make cloth napkins for your family. So if you've ever thought about making them, but were unsure of where/how to start, this is for you :)

Step 1: Gather Your Equipment
Not pictured is an ironing board, sewing machine, and thread. You'll need those too :)
Step 2: Measure & Cut
1 yard of fabric will make {4} 16x16" napkins. I picked up this fun print on clearance at Hobby Lobby for $3! For 16x16" napkins, measure and cut 18x18" squares. {You want a 1" seam allowance on each side of your napkin for hemming.} Depending on how much fabric you have, you may decide on bigger napkins. However big/small you want them to be, add an inch on each side. Make sense?

Step 3: Hem & Pin
Now that your squares are cut, lay them on the ironing board, pretty side down. On one side, fold the fabric over 1/4" and press with your iron. Then on the same side, fold it another 1/4" and press again. That should make a total of 1/2" folded. 
Pin the fold in the middle to hold it in place. Sorry for the microscopic picture. I should've taken the picture from the other side to show you, but hopefully this makes sense!
Do the same thing for all 4 sides. Pin each corner to hold those in place, too! Measure your napkins to make sure they are 16x16".

Step 4: Cutting Corners {literally, not figuratively}.

Unpin one of the corners and cut about 1/2" off, like in the picture below.
Fold the cut corner about 1/4" inward.
 Now refold the left side on the seam that was created from ironing. 
And refold the right side so it creates a clean edge. Pin it back in place.
Sewing your corners like I did is optional. I prefer to do it this way because it prevents the fabric rom fraying and has a clean, professional look when it's complete. That's probably the toughest part of this project, but it's super easy once you get the hang of it.

Step 5: Sewing
Take your first napkin to the sewing machine and begin making a straight stitch down the fold, removing pins along the way.
Use the hem of your fabric and the presser foot as a guide. This will help create a straight line.
When it's done your sides & corners should look like this.
Cut any excess string from where you started/stopped sewing. There ya go! Four beautiful & reusable napkins for $3. My husband and I are still using napkins that I made a year ago, so these will last a while!
If you have any questions or need further details, please email me at contemporarysouthteacher@gmail.com. My button is on the sidebar. Happy sewing!

post signature

Thursday, July 25, 2013

Bunting!

Those of you who stalk follow people on Pinterest have seen dozens of fabric bunting ideas, if not more. One of my summer projects was to make one of these for my classroom. Here are some of my "Pinspirations":
See this one {here}

The first pic is pretty ordinary, but I absolutely L.O.V.E. the second one! This person made it from scrap fabric. How cool is that?! My favorite part is that none of the fabrics match, which oddly enough make it all go together. Or is that just me? Anyway, back on track...

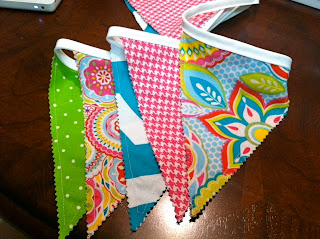
I decided to go ahead and make mine today since it was pretty gloomy outside {what else is new}. To start, cut a triangle from a piece of cardstock. Ready for a brief math lesson? This is an isosceles triangle because two of the sides are the exact same length. The shorter side measures 6 1/3" while the longer sides both measure 8 2/3". It really doesn't matter how big/small you make the triangles, as long as it is isosceles. Make sense?
Then get your fabric situated. Lay the fabric on a table with "ugly sides" touching. The "pretty sides" should be showing on the top and bottom. Then lightly trace your triangle template.
Cut the triangles with regular fabric scissors first. {I will explain why as we go through the steps}. Continue cutting out triangles until you have your desired amount. I decided to cut 2 triangles for each print, but the cool part about this project is that the design and pattern are completely up to you! 
Pin your triangles like so to hold them into place.
Ok, so here's when I explain the purpose of cutting with regular scissors first, rather than your pinking sheers. Prior to doing this I practiced on some scrap fabric from my black hole storage box. I cut my triangles with pinking sheers first, like most tutorials say to do, but when it came time to sew, the zig-zag edges looked a little...funky. The edges weren't lined up and it didn't look polished. That's when the idea hit me. {Cue inner dialogue} If I cut with regular scissors first, and then sew a straight stitch, the fabric will be secured in place. Then I can trim the edges with my pinking sheers!
I highly recommend doing it this way. It was so much easier! 

Get out your sewing machine and sew a straight stitch about 1/3" from the 2 long edges. Don't worry about sewing the short end closed. You will do this at the very end with bias tape. Now take your pinking sheers and trim the edges! Here's a close-up:
Look at those edges...mmm mmm!

Arrange your finished triangles in the order you want them sewn.
Unravel your bias tape. I accidentally bought the wrong width, so pay attention to that when you're shopping! I got 7/8", which was waaay to thick for my size triangles. But no worries! I simply folded it in half once and it worked perfect. And I apologize for not having any pictures of this step, but I couldn't hold down the fabric and snap a pic at the same time ;)
In other words, make sure your bias tape is an appropriate width for your size triangles.
Before you start sewing, decide how you want to hang the bunting. I've seen people tie it to things by making a bow/knot, pin it in place, or loop it onto something. Whatever method you decide will determine how much tape to leave at each end. For example, you will need to leave more tape if you're planning on tying it rather than looping it. 
I am planning on looping mine above my blackboard, so I sandwiched the first triangle between the folded bias tape, about 6" from the end. The edge of the fabric should line up with the crease in the fold. Straight stitch across. I left about a 2" gap between each triangle. Continue sewing your triangles, sandwiching them between the fold. When you're done, cut the tape 6" from the last triangle {or whatever length you used on the other end}.
Here's a close-up of my color palate.
And here it is hanging up! Pardon the not-so-pretty background. I will be getting better pictures tomorrow. 
 
 
If you would like a custom set for yourself, a friend, or your classroom, visit my Etsy shop for purchasing information! My button is also on the sidebar.
**{posting will be available by tomorrow}

post signature